Monday, December 30, 2013

OPI Mariah Carey Holiday 2013 Liquid Sand

Hey everyone! I hope you all had a good holiday. Mine was surprisingly devoid of new polish. I thought that would be everyone's go-to Christmas gift for me but instead I think my family and boyfriend are staging an intervention! That's perfectly fine, though (the not receiving polishes part, NOT the intervention part! I won't admit that I have a problem!). I adore the gifts that I got and you won't see me complaining. That being said, I want to show you the three polishes that I did get for Christmas - three OPI Liquid Sand minis from the Mariah Carey 2013 Holiday collection, given to me by my lovely grandmother.

First up is Make Him Mine, a rosy metallic textured polish with silver glitters. This polish is so sparkly and shiny, I instantly fell in love with it! The formula was great on all of these. I used two coats for the photo below.


Next up is Baby Please Come Home, a silvery metallic purple textured polish with silver glitter. This one disappointed me a little because it came out much more silver than purple on the nail. The purple color was more prominent in the bottle. I was impressed with this polish, though, because this picture was taken this morning after three days of wear, with one of those days including a 12 hour shift at the hospital and look! Only minimal tip wear! I like that in a polish. Formula was good,  I used two coats for the photo below.


Lastly, have Silent Stars Go By, a champagne pink textured polish with silver glitter. I don't know about you, but I think this one is perfect for New Years Eve! Formula was good. I used two coats for the photo below.


I am really impressed with these OPI Liquid Sand polishes! I love how sparkly they are. I think I may have to buy the full size of Make Him Mine and maybe even a few more from this collection. Which ones do you like?

Thanks for stopping by!

Maggie xx

Thursday, November 28, 2013

Color Club Poptastic Collection

Hey everyone! Happy Thanksgiving! What are you thankful for? I'm thankful for my wonderful family and friends, my kitty Finn, my nursing career, my job, a loving home, nail polish and of course my followers of my blog and my Instagram! Today I have a bit of an unusual post for the season. I came across a box set of seven polishes from the Color Club Poptastic Collection for $10 when I was shopping at Marshall's the other day. It was a no-brainer - I HAD to buy them. I mean come on, 7 Color Club polishes for $10? You'd be crazy to pass that up. So here's some neon nail polish to brighten up your winter season :)

First up is Poptastic, a neon barbie pink creme. It's lighter and a bit more red toned in person. The formula was slightly streaky. However, all of these swatches are without top coat. Look at that high shine finish! Shown is 3 coats.


Next is Warhol, a hot pink creme with blue undertones and a slight satin finish. Great formula - shown is 2 coats, no top coat.


Next is Wham! Pow!, an absolutely eye searing neon orange creme. As you can see, my camera freaked out a little bit with this color. The formula was pretty streaky. Shown is 3 coats, no top coat.


Next is Almost Famous, a bright yellow creme. The formula was surprisingly good for this kind of shade. Shown is 2 coats, no top coat.


Twiggy is a light kelly green creme bordering on mint. The formula was perfect. Shown is 2 coats, no top coat.


Chelsea Girl is a lovely medium blue with a crelly/satin finish. This was one of my favorites of this collection. The formula was buttery and smooth and the color just popped off my nails! This is what I imagine the color of Nails Inc. Baker Street would look like (since I've never seen it in person - boo!). Shown is 2 coats, no top coat.


Finally, we have Pucci-licious! I love the name, it's kind of naughty 0_0 This is a medium purple creme. The formula was great, shown is 2 coats, no top coat.


I hope you enjoyed a little burst of neon on your Thanksgiving! Thanks for stopping by!

xoxo Maggie

Thursday, September 26, 2013

Rainbow Honey 20% Cooler


Hey everyone! Today I have a quick post for you - Rainbow Honey 20% Cooler layered over Zoya Blu.

Zoya Blu is a gorgeous baby blue creme. It was almost a one-coater, which is pretty amazing for a color like this. The formula was flawless. Shown is two coats of Zoya Blu.


Next, I layered one coat of Rainbow Honey 20% Cooler over Zoya Blu. This polish is gorgeous! It has a rainbow of medium and small hex glitters in a clear base with a light blue shimmer. The formula on this was great, but I'm really glad Rainbow Honey has changed their mini bottles since these. These mini bottles have huge lids and very short brushes, which makes it a bit difficult to work with the polish. However, I was able to manage and, like I said, Rainbow Honey has changed their mini bottles since these were released.


I'm loving this combo! If you didn't know, 20% Cooler is part of a collection that was inspired by the characters of My Little Pony: Friendship is Magic. This polish was inspired by the awesome Rainbow Dash!


http://fc05.deviantart.net/fs71/i/2012/197/d/e/rainbow_dash___colors_of_the_wind_by_stabzor-d57gmxw.png

(Rainbow Dash photo cred: http://stabzor.deviantart.com/art/Rainbow-Dash-Colors-of-the-wind-314864420)

Thanks for reading!
Maggie

Wednesday, September 25, 2013

Autumn Colors Waterfall Manicure

Hey everyone! Guess what - it's FALL! It's my favorite time of year. I decided to start the Autumn season off with this waterfall manicure. This technique was made up by Sam over at The Nailasaurus - you can check out her tutorial on her blog here.

I started off with two coats of OPI Don't Pretzel My Buttons, a nude creme. The formula on this one was thin to the point where you could see every ridge and imperfection of my nails. Needless to say, it looks better with top coat. Here's a picture of Don't Pretzel My Buttons:


Next, I used a very thin paint brush to paint stripes of different and lengths my nails.


And because it's been requested, here's a picture of my right had. Here's proof that I can do nail art with both my hands! Super awkward hand pose though! >_<


Here are the colors I usesd:

Spoiled - Designated Driver
Zoya - Arizona
Zoya - Sookie
OPI - Malaga Wine
Sinful Colors - Georgio

This is the second time I've used these paint brushes and I still need some practice but I really like how these turned out! I hope you guys enjoy.

Thanks for reading!
Maggie  

Tuesday, September 17, 2013

KBShimmer Swatch and Review

Hey everyone! I'm finally to a point in my schedule where I'm not working or having clinical 7 days a week! That means more blog posts :)

Today I have my latest haul from KBShimmer. I got a gift certificate for my birthday and these are the polishes I picked out (excluding Hex Appeal. I already had it and recently swatched it so I just decided to throw it in).

First is the very famous Clown Puke, a glitter topper in a clear base. This is the definition of a glitter bomb! According to the KBShimmer website, there are over a hundred different shapes, sizes and colors of glitter in here! They range from large to micro, metallic to matte, and hexes to hearts, squares, diamonds and circles! Shown is one "coat" dabbed over Sinful Colors Easy Going.


Next is Excuse Me, I Blurped. This is a not blue not purple (blurple!) jelly base with blue, pink and purple hexes and a sprinkling of copper hexes throughout. Application was pretty good, although I did find that the jelly base dragged a little bit. Try not to go over one area more than once if you can avoid it. I used three coats alone in the photo below.


Next is Hex Appeal, a polish with a sheer navy blue base and silver, blue and magenta hexes and mini bars. Some of the magenta hexes are even holographic. I adore this polish and I usually layer it over blues. This time, however, I paired one coat of Hex Appeal over OPI Black Cherry Chutney, a very dark, almost black magenta shimmer. As you can see, the glitter payoff is great!


Next we have You Go Ghoul!, a black jelly with purple, magenta and orange hex and mini bar glitters. This polish is perfect for the upcoming cold months and I can see myself reaching for it often. The formula was flawless as usual. Pictured is two coats over (once again) OPI Black Cherry Chutney.


Finally, we have Ice Queen. I never thought much of this holographic glitter topper when I saw it on blogs and Instagram, but that was because pictures truly do not do this polish justice. When I saw my first video of this polish in action, I knew I had to get it! The holographic hex and diamond glitters are absolutely breathtaking in person and I am so glad I bought this polish. The glitter payoff is great - this is one coat over Sinful Colors Candy Coated.

Light Box

In the shade - you can see the sky reflected in some of the glitters!

If you'd like to see the video of Ice Queen in action, check it out on my Instagram feed here.


Christina from KBShimmer makes some seriously amazing nail polishes and it's all I can do not to empty my bank account whenever I decide to buy a few! I've never once been disappointed by any of her products. You can purchase KBShimmer nail polishes at the KBShimmer website.


Thanks for stopping by!
Maggie

Wednesday, August 21, 2013

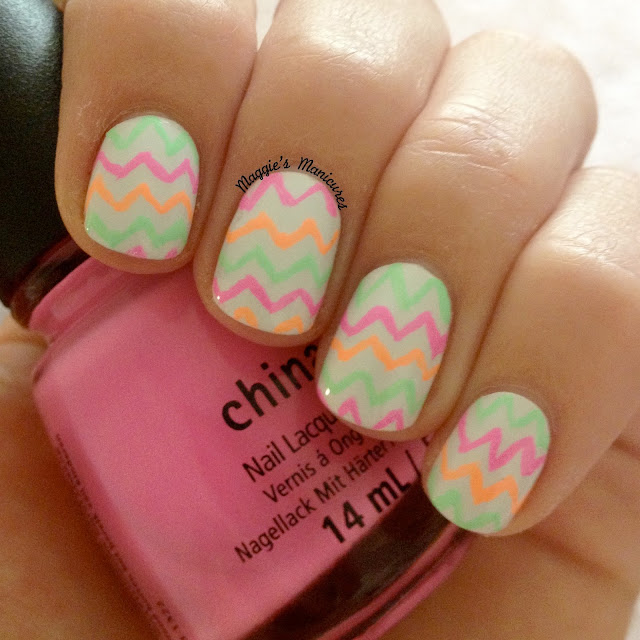
Hand Painted Neon Chevrons

Hey guys! I'm sorry it's literally been forever since I've done a blog post or posted on Instagram. Here's the skinny: 1. I was on vacation with 99% no internet access and 2. My poor nails have been super peely lately (and when I say lately I mean the past 6 months to a year) and I've had about enough of it. So, on vacation I decided to give my nails a break and try out Duri Rejuvacote. I've heard a lot of awesome things about this product, but it didn't really work for me. For the record, that may be entirely due to the fact that I was camping and I got an extremely large amount of dirt under my nails, around my nails and in between the layers of peel-age and Rejuvacote. Therefore, I don't think my "review" of this product should really be taken under very much consideration. I am, however, going to try Nailtiques Formula 2 nail treatment again. It worked for my peeling nails in the past and the only reason I stopped using it is because it's literally $20 for a single 15ml bottle that gets goopy and thick halfway through. I'll let you guys know how that works for me once I can afford it. Right now I'm still using the Rejuvacote. On to nails!

Today I have a really different (to me) manicure - neon chevrons! Now, I've done chevrons in the past but I've never hand painted them. I came across a couple of paintbrushes in my vacation travels for $2 a piece and I just couldn't pass them up. They are really crappy to say the least, but they kind of got the job done. I think I need one with much shorter hairs so I can have more control over the brush and just keep the two I bought as stripers. That being said, I am really proud of how these came out. I'm not one for drawing or hand painting anything and I thought these look pretty cute. Also, (and this is very important to mention), I almost always take pictures of my dominant hand because for whatever reason those nails always look better. Therefore, drawing chevrons with my non-dominant hand was tricky - especially with that super skinny brush! Needless to say, I am very happy with these.

Light Box

Light Box

Indoors/Shade

Outdoors Shade


For this look I started off with OPI My Boyfriend Scales Walls and painted the chevrons with China Glaze Highlight Of My Summer, Sun Of A Peach and Bottoms Up (you can see swatches of these colors here). I just love how these neons almost glow in the shade! I figured I'd try to use these China Glaze Sunsational Neons while I can before Autumn starts creeping in. I hope this post wasn't too rambling for you guys...I tend to do that ;)

Thanks for reading!
xx Maggie

Thursday, August 1, 2013

China Glaze 2013 Sunsational Collection

Hey everyone! It's been so long since my last blog post and I really apologize! I've been extremely busy with work. So, I decided to make it up to you guys by posting the entire China Glaze Summer 2013 Sunsational Collection! There are 6 jellies/crellies and 6 cremes. The as you've probably heard, the formulas were pretty difficult to work with with the exception of a couple. I'll talk more about the formulas at the end of this post. Lets get started!


First is Bottoms Up, a neon bubble gum pink with a creme finish. Shown is three coats plus top coat.


Next is Heat Index, a hot pink neon jelly. This one has more reddish undertones than this picture shows. Shown is three coats plus top coat.


You Drive Me Coconuts is a blue based hot pink crelly (jelly/creme hybrid). Shown is three coats plus top coat.


Next is Neon & On & On, a pink leaning coral with a creme finish. This is three coats plus top coat.


Shell-O is one of my favorites of the collection, a corally-pink jelly. I used three coats plus top coat for this opacity.


Next is Sun Of A Peach (love that name!), a peachy, orange sherbert creme. This one is really neon! I had a hard time catching the true color. The color you see in the bottle in this picture is more accurate than the color of my nails. This is three coats plus top coat.


Highlight Of My Summer, a neon mint creme (Neon mint?? You don't hear those words used together very often!), also induced a camera freak-out. However, with some photo editing, I was able to get this photo pretty color accurate. Shown is three coats plus top coat.


Next is Keepin' It Teal, a green based teal jelly. This is three coats for this opacity, plus top coat.


Too Yacht To Handle is a green based turquoise creme. No matter how hard I tried I could not get the color of this photo right! I had swatched this polish a couple months ago and the formula was super thick, goopy and bubbly - just terrible! So I added some polish thinner right then and there and when I popped this baby out for this blog post I was delighted to find that the formula had been completely transformed! I only used two coats plus top coat for this swatch and there was not a bubble or streak to be found.


Isle See You Later is a blue jelly. This is easily the worst China Glaze polish I've ever owned. The formula was so watery and sheer that even the four coats (plus top coat) shown here left much to be desired. I've seen it layered over white to create a baby blue color but even then the person who did it said she used four coats to achieve that look. Over all it's a very disappointing polish.


That's Shore Bright is a medium purple creme. The formula on this one was also pretty fantastic on it's own without thinner or anything. This is two coats plus top coat.


Finally we have Are You Jelly?, a warm, red based purple crelly. This one reminded me a lot of China Glaze Creative Fantasy, only brighter. Shown is three coats plus top coat.

On formulas: for the most part, this collection was pretty tricky to work with. I've had these since about April or May and I've used them a lot, so I'm more or less familiar with the formulas. It helps to use a generous amount of polish on the brush and also try to not brush over the same area of your nail twice. These polishes set up pretty quickly and they don't really level out very well, so if you do more than three or four strokes per nail you'll probably have issues with balding. Also, it helps to use a super shiny top coat to smooth everything out. I used Seche Vite in all of these photos.

Formulas and Isle See You Later aside, I am in love with this collection. It's bright, fun and perfect for summer. I love all of the colors! I'd say my top picks for this collection are Shell-O, Bottoms Up, Heat Index and Too Yacht To Handle.

Thanks for reading!
xx Maggie


Monday, July 15, 2013

Galaxy Nail Art

Hey everyone! Today I have some really fun and easy galaxy nail art to show you. Galaxy nails were one of the very first designs that I tried when I really started getting into nail art about a year ago. I feel like I've come so far since then! If you keep reading I may even show you a picture of the old ones I did... ;)

I started off with two coats of Wet 'n' Wild FastDry Ebony Hates Chris, my favorite black creme. It's almost a one-coater and the formula is flawless. Next, I ripped off small chunks of a make up sponge and pair of tweezers to sponge different colors onto my nails. I used OPI DS Magic (blue/purple), DS Indulgence (orangey red) and Flashbulb Fuchsia (fuchsia, duh) and Zoya Zuza (turquoise). I always sponged on DS Magic first, but the other three colors I sponged on in random order. Once I was happy with the result, I took my small dotting tool and made teeny stars with Sinful Colors Snow Me White. I finished my manicure off with Sally Hansen Diamond Flash Top Coat.
Left Hand

Right Hand (awkward!)
Okay you guys, because I love you all, I decided to show you how far I've come in just a year (even though it's super embarrassing)! Here's a picture of my very first galaxy nails:


I used to bite at my cuticles as a nervous habit and they seriously look rough in this picture. Also note that this picture was taken with my crappy iPhone 3S camera in my car! But here's my point: if I can do this, I believe anyone can! I'm still working diligently on getting over the cuticle biting habit, but It's going much better than expected. So if you ever feel discouraged about your nails, just remember that not so long ago, I was feeling the same way too. It just takes a lot of practice. And also, I love passing my knowledge along (and I'm still learning, too!) so please, never hesitate to ask any questions.

I hope you guys enjoyed this post. Thanks for reading!
Maggie <3

Sunday, July 14, 2013

Squared Away Jelly Sandwich

Hey everyone! Ever since I saw Instagram's @lafemmelulu's amazing jelly sandwich using KBShimmer's Squared Away, I knew I had to recreate it!

First, I started off with two coats of OPI Don't Touch My Tutu!, a white jelly. As you can see, it's a little patchy here and there. If you wanted to wear this alone, I'd recommend two to three coats depending on how proficient you are with polish application.


Next I added one coat of KBShimmer Squared Away, a gorgeous glitter topper with different sizes and colors of square glitter. I did a little glitter placement here and there with the big glitters to make sure it was spaced out evenly on my nails.


Finally, I added one more coat of Don't Touch My Tutu! to create the jelly sandwich look.


I love this glitter so much! Even through the jelly sandwich I can still see the rainbow effect of the holographic glitters. If you have these two polishes I really suggest you try this out!

Thanks for reading,
Maggie

Friday, July 12, 2013

Swirly Neon Dots

Hey everyone! Today I have some nail art for you. It's been so sunny and gorgeous lately that I just can't keep away from my China Glaze 2013 Sunsational Neons. I like using these polishes for nail art instead of by themselves because the formulas are so tricky. For this manicure I used only the cremes.

I started off with OPI My Boyfriend Scales Walls, my favorite white. Then I used my medium dotting tool to make the swirls! The first picture was taken with my home made light box, the next two were taken in direct sunlight and the fourth one was taken in the shade.

Light Box

Direct Sunlight

Direct Sunlight

Shade
Colors used:
-Highlight Of My Summer (lime green)
-Bottoms Up (hot pink)
-Sun Of A Peach (orange)
-That's Shore Bright (purple)
-Neon & On & On (coral pink)
-Too Yacht To Handle (teal)

Dotticures are so easy to make - they are my go-to for nail art. I hope you guys like this look!

Thanks for reading!
Maggie :)